
Orko Tutorial
Orko is one of my favourite things I’ve made over the years so I’m happy to do this little write up for mermush on twitter. It’s been a while since I made him so I’m sorry if I forget anything/something doesn’t make sense!

Everything I used:
a small teddy bear
a small bouncy ball for the head
Doll’s straw hat (got mine at hobby lobby.)
purple, red and black stretchy fabric
Yellow and Blue craft foam
blue Model Magic OR plaster gauze + blue paint
Black marker
hot glue
wire
batting
duct tape

1. I bought a small, pose-able Teddy Bear at Hobby Lobby. Any kind of stuff animal the right height would do, I liked that his arms were joined so I could move the arms, and he wasn’t overly “cuddly,” he was pretty sturdy which helped.
2. I wrapped his body in batting, and then covered it in duct tape to hold it in place, to give him the right width. If you found a stuffed animal that was more of the right width you could skip this!
3. The wire I use is very bendy. I wrapped it around his arms and taped it into place, leaving about 3 inches sticking out from the end of arms. I used a thinner wire (a thin floral-type wire) to create “fingers” – just twisting the thinner wire around the end of the thicker wire. Doesn’t really matter how it looks since it will be covered up later.
4. The small kid’s bouncy ball I had I got at Target – it was Spongebob or Barbie or something. One of those thick, rubbery type balls, like a mini basketball – not a plastic type. It just needs to be the right size for the head. I cut it open at the bottom and fitted it over the Bear’s head, and glued it in place. Then I wrapped it in black stretch fabric. I just glued it down and had a seam running down the back (under the hat), just make sure it’s smooth in the front.
I covered his wire hands/arms in plaster gauze to make the hand and finger shapes, then painted it blue. I think using blue Model Magic would be easier now!
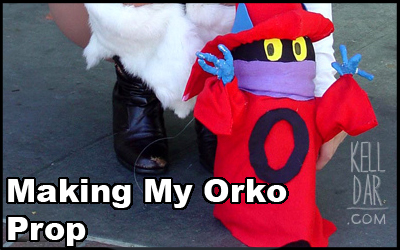
5. His robe was just two red triangles sewn at the sides. I put it on him and I I glued his sleeves on around his arms. Also glued the black “O” onto the front. The purple sash at the top was just a piece of purple fabric, glued in place and glued at the back.
6. Orko’s eyes were yellow craft foam, cut out and glued on. I drew his eyeballs in with a black marker, but you could use anything else.
7. I found a doll’s straw hat also at Hobby Lobby. I changed the shape of it by gluing craft foam around it -one larger piece in the front, a shorter one in the back, and a piece at the back of the brim to lengthen it in the back. Then I covered it in red stretch fabric – did the brim first, just gluing it into place. Then the top of the hat I cut longer so it would hang down past the point of the craft foam, and same routine, gluing in place.
8. Finally his ears were just blue craft foam glued onto the top of the hat. and you’re done! I sewed some fishing line into his back so he could “float” along next to me.
I hope that helps! 🙂
(Do you have a costume or convention question you’d like to ask me? Ask on my facebook page, twitter, or my contact page here, and I’ll see about answering it for FAQ Friday!)


