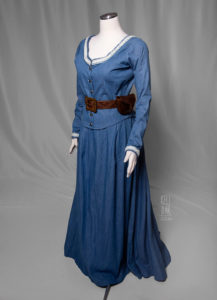
Dolores Abernathy
Source: Westworld
Made for: Southern Fried Comic Con 2017
Journal Entries: Read more at my Dolores tag
Related Costumes: Johanna Mason
![]()


![]()
 Patterns Used:
McCall’s 3449 (bodice), something else for the skirt, will have to go back and look.
I grew up terrified of Yul Brynner because of the original Westworld movie, so when HBO announced a whole series I was super excited, and ended up really loving it. I thought making a quick Dolores costume would be fun.
For the fabric I got a “eh it’s good enough” blue cotton at the fabric store. it actually ended up being really nice to work with, it was soft and doesn’t fray a ton. So I’ll forgive the fact it’s not super accurate because it’s super comfy 🙂
Top: I used McCall’s 3449 (link above) for the top. It wasn’t exact but it had a good shape. I made a mock-up out of scrap fabric using the pattern as it was, and from there eliminated some of the seams and added the darts into the front — there were a few more darts/seams on the original but I only went with the ones that were visible on the front.
I used the same sleeve pattern from the McCall’s pattern, just lengthening it into a normal sleeve shape. In the end I went through 3 mock-ups all together – the 3rd one ended up being the lining of the top. I added the button holes, and bought buttons locally (repainted and weathered them).
For the trim, I ended up making the pleated trim for the neckline/sleeves out of my cotton. My original version was too thick and too large, so I took it apart, cut it down, and re-pleated it smaller. I bought 4 trims locally – a velvet ribbon (in a lilac colour), an off-white lace, a yellow rick-rack, and a white rick-rack (they didn’t have the shade of blue I wanted).  I used some Rit DyeMore on the velvet ribbon and white rick-rack to get them more of the blue tone that I needed. I machine-sewed the top edge of the velvet trim onto the neckline/sleeves, and hand-stitched it down along the bottom edge. After that it all got too thick to sew on the machine anymore! I hand-sewed the lace into place on top of the velvet trim, and then the rick-rack on top of that. (I did machine-sew the two rick-racks together before sewing them onto the top, so that made life easier!)
Skirt:
For the skirt, I DID use a pattern but at the moment I’m blanking on what it was and I’m not seeing anything that is sparking my memory in my online pattern collection… but it was really just a very basic, floor-length, 4 paneled skirt pattern. I cut it a little longer than the pattern called for so I’d have some room to play with a little train in the back, and I split the back panel into two so I’d have a center back seam. I added 2 darts in the front, and then everything from the side seams back are pleated. I ended up having to hand-tack the pleats into place at the top – this fabric is so static-y that they would get hung in weird positions otherwise.

Added a waistband at the top and a back zipper. I probably left the train a litttttle longer than I should have but I always do that.
Wig:
I searched for wigs for weeks and couldn’t find anything I really liked. Finally it was coming down to the wire and I found this one on amazon (I’ve never bought a wig on amazon before), took the chance and I ended up being really pleased with it.
I did have to alter it a bit — first up, it was way too big so I had to cut the combs out and move them up about an inch and a half (they were on top of my ears otherwise). Then I mised up a sharpie solution (black and brown + alcohol), and using a toothbrush, I combed it in to create the look of darker roots. (I did find LOTS of blonde wigs with dark roots in my search, but they were all too dark at the roots — I wanted something more subtle.) Then I trimmed it up a little and curled it.
Accessories:
Thankfully my Jane corset worked fine for this and I didn’t have to make anything new. I did have to do some repair work on it, but not too bad!

One of the first things I had to make was a bustle. My Jane bustle was far too big, and I couldn’t really find anything online that looked like what I needed, so I experimented. I had some quilted cotton leftover from Tightrope Walker, so I used that — I just played around with pleating it in different ways til I found a way I thought looked nice, then I sewed it onto a square panel, added some ribbons to tie it on, and voila, done…. or so I thought. Towards the end of working I realized it was causing the skirt pleats to sit funny, and that was because it was too big/long. I trimmed it down and pleated it in a different way, and it worked perfectly after that.
Thankfully the belt was easy enough to track down since they used a Tandy kit on the original! Picked that up along with some antique gel. Chase made my belt buckle for me based around an existing plain square buckle. I made the pouch out of some leftover leather and we dyed it to match.
My boots were old ones I had! And I bought a cheap white dress on amazon to wear underneath it as a chemise – not super accurate but it gets the job done.
Final Thoughts:
I was pretty happy with how this turned out! Just not happy with the wig. I need to invest in a better one.
![]()


![]()


Please note that none of these costumes are for sale! This is my personal portfolio.