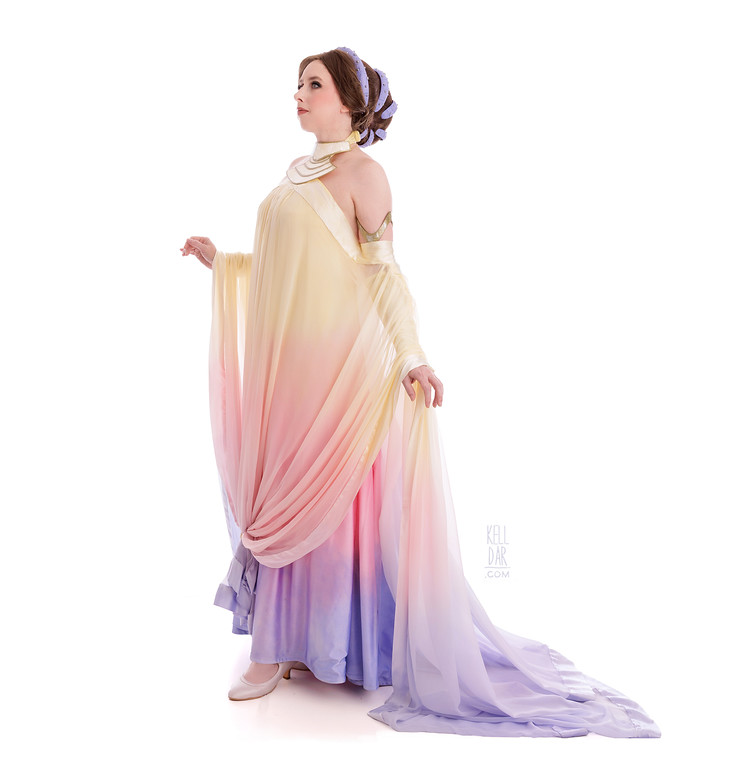
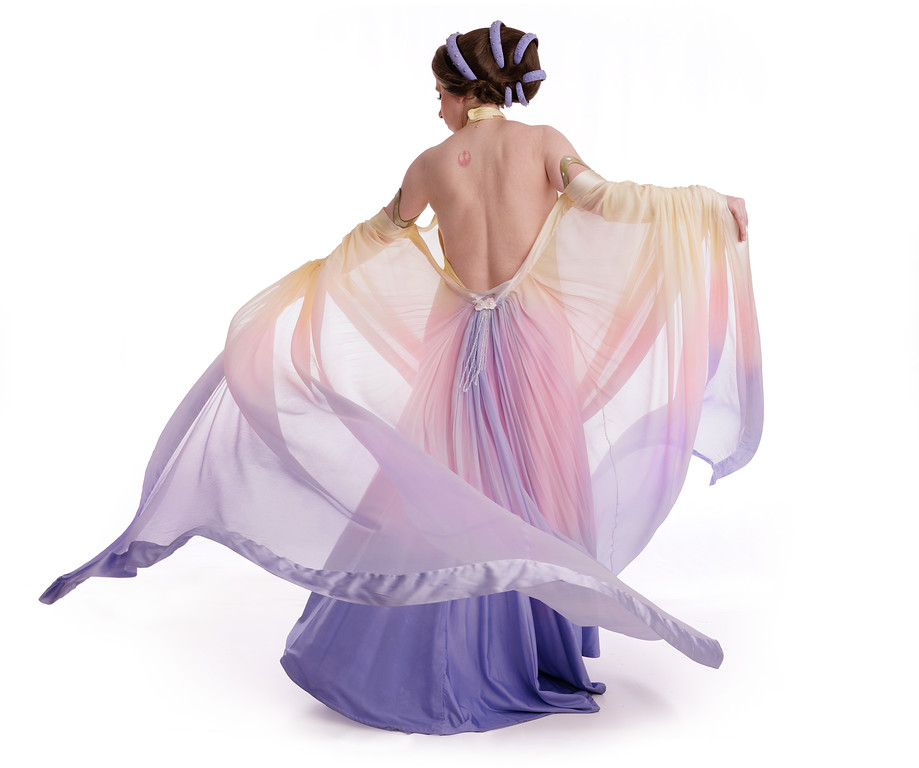
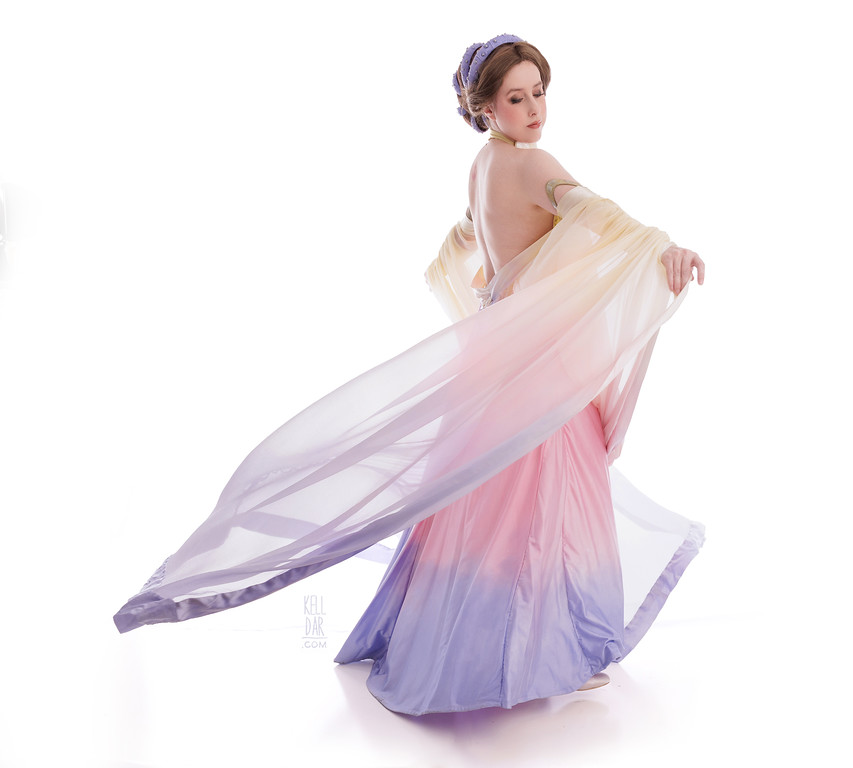
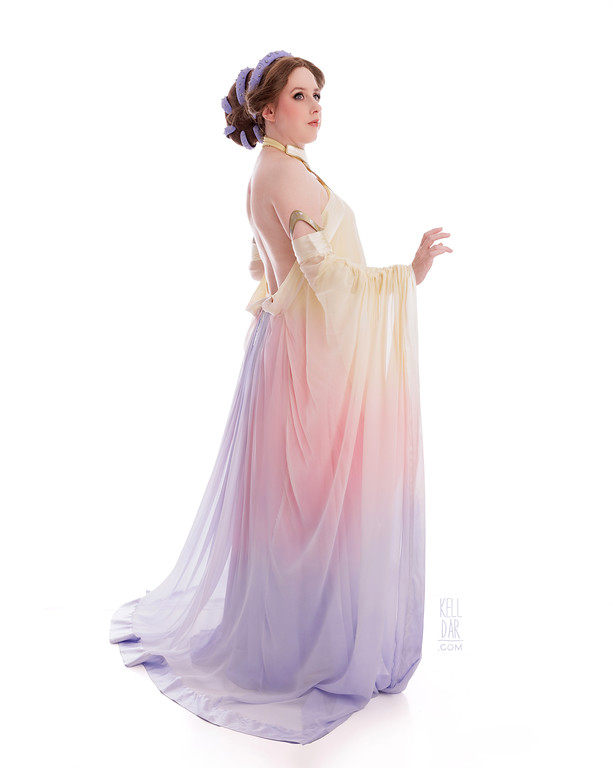
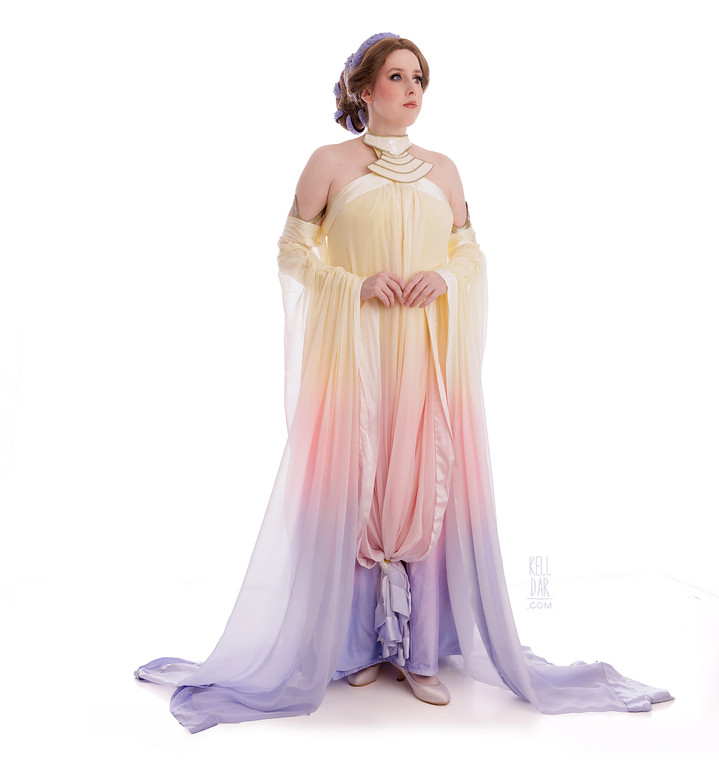
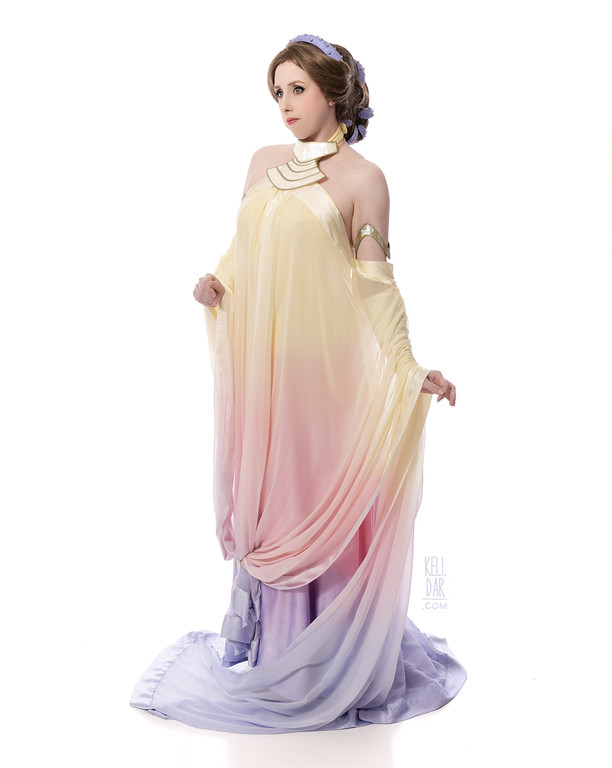
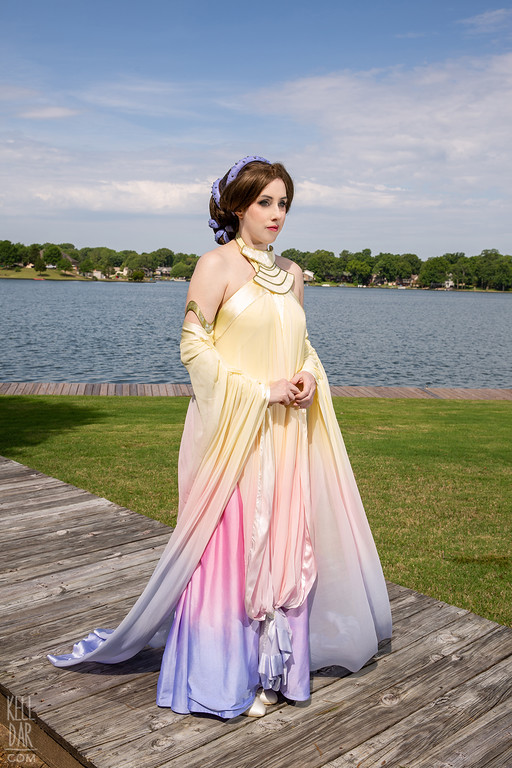
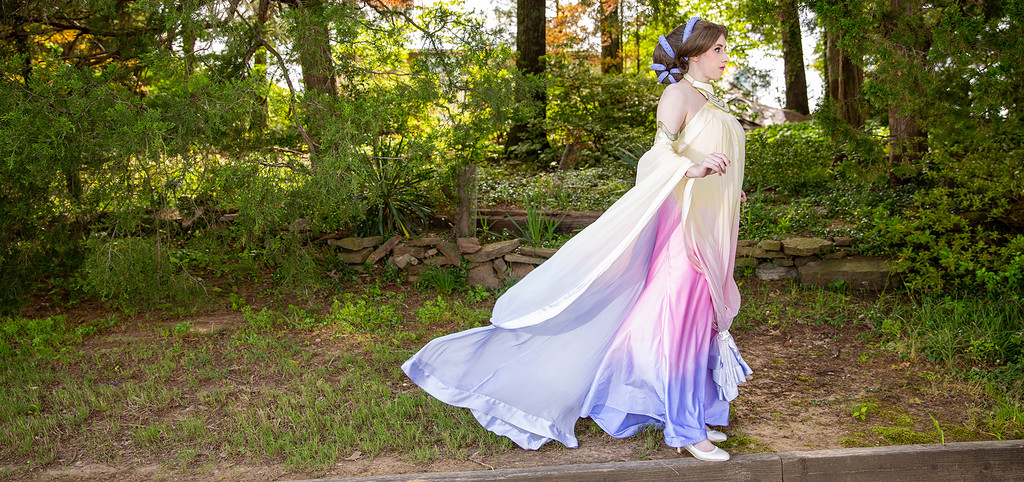
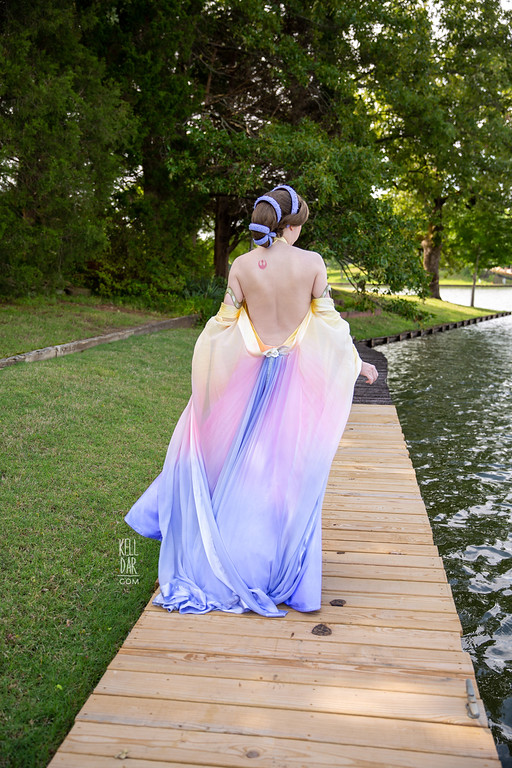
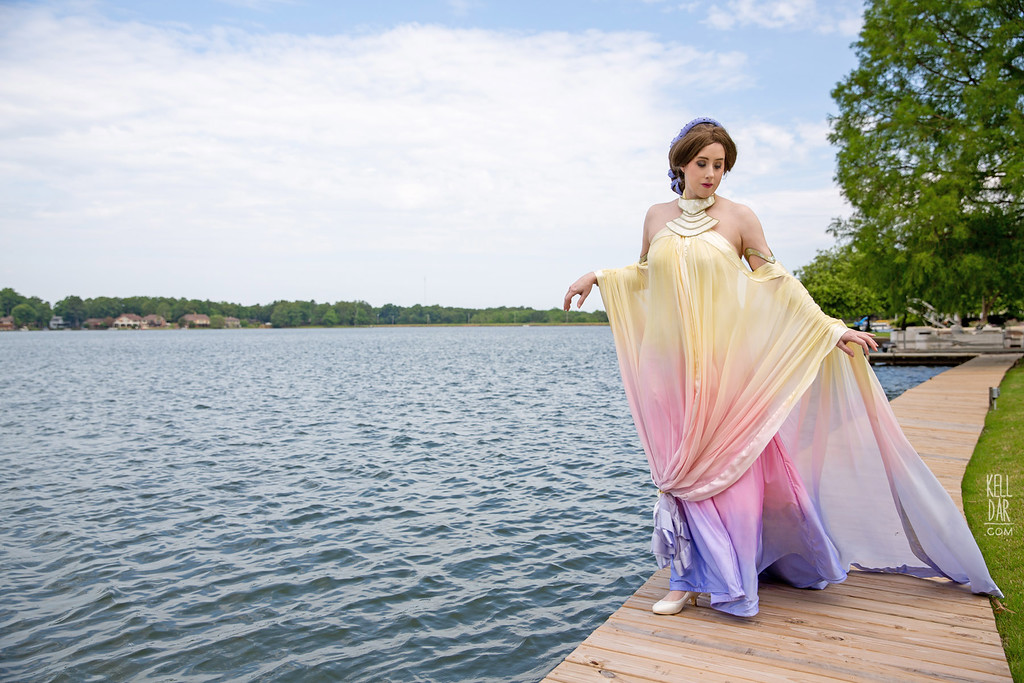
Padme – The Rainbow Lake Gown, Version 5
Made for: Dragoncon 2019
Journal Entries: Read more at my Padme Lake #5 tag
Related Costumes: Padme Lake Dress 2008, Padme Lake Dress July 2006, Padme Lake Dress March 2006, Padme Lake Dress 2002, Padme Lake Dress Disneybound
![]()


![]()
 Patterns Used:
Vogue V8361 (underdress – modified)
Underdress:
I was always really happy with my underdress for versions 3 and 4, so I wanted to do the underdress for #5 in the same way – spandex using a Vogue pattern. I picked up the spandex at Hobby Lobby (Joann never has white spandex, what’s the deal) and hunted for the Vogue pattern I used previously, which was V7797. But post-move, I couldn’t find that one. I know it’s around there somewhere, but in my hunt I turned up V8361, which I’d bought as an alternate option for this AGES ago and never used. I decided to give it a go.
I modified this pattern quite a bit; I got rid of the straps, changed the shape of the back opening, added darts in the front to curve the front edge, and lined the entire thing. I also added insets into each side seam and the back seam to widen the skirt past the knees, giving it more of a mermaid-style flare. I started out doing my modifications on the lining layer – I quickly gathered the top edge at the neck and put it on myself, pinned the darts in so that there would be no gaping along the chest, and sewed them in place. Repeated it on the outer layer, then sewed both layers together at the “top opening” – the side edges around to the back. Then flipped it.
I left the side and back seams open from about mid-thigh down – I had 4 large triangles of left over fabric (just made by cutting the dress panels out – it left large triangular pieces). I cleaned those pieces up and sewed 2 of them together to make one large triangle. That one I sewed into the back seam. The other 2 I sewed into the side seams, one on each side. The problem I had was I didn’t have enough fabric to do these insets separately on the outer layer and the lining layer – so I sewed them into the outer layer, then hand-stitched the lining layer in place on the interior. It wasn’t a great solution. I should have gone back and gotten more fabric.
After that I hemmed it, and then permanently gathered the top edge of the dress at the neck. I made a collar piece of the spandex with interfacing to prevent it from stretching, and attached at the top of the underdress. It closes with a hook and eye.
Overall, not particularly happy with how the underdress turned out; I wasn’t in love with this pattern and wish i’d gone with my old tried-and-true. The dress wasn’t as full as I wanted at the bottom, and the messiness of having to sew the lining around the insets was a bummer. I may remake it one day; or I may not. I Kinda want to be done with this, LOL.
Outerdress:
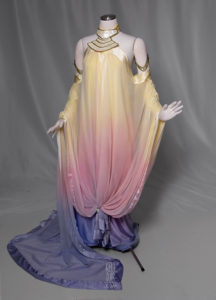
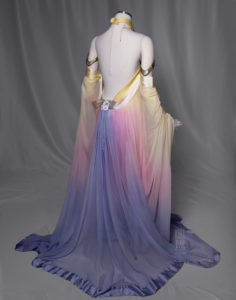
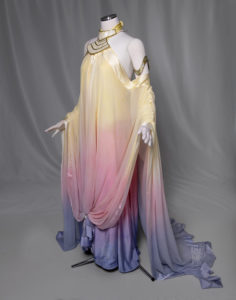
So version 1’s outer dress was some kind of lingerie-type material. Version 2 was a poly chiffon. Version 3 was some sort of silk blend. Version 4 was a georgette. I wanted to do georgette again because I just love how Version 4’s turned out, the weight and opacity were perfect to me. Unfortunately every fabric swatch I got of georgette was not even close. (Kinda makes me wonder if the “georgette” I used for Version 4 was mislabeled?) I decided to just go with silk chiffon, which I ordered from dharma.
When I made Version 3, I made fabric mock-up panels that had notes written in the corners and used those as a pattern guide for Version 4. I kept them for years… until I realized they’d be perfect for Mon Mothma LOL. So yep, I used those panels to make my Mon Mothma 2 years ago, so patterns and notes gone. Thankfully I still had all my outer fabric pieces from Version 3 – I’d just have to tweak them the same way I did when I made Version 4. Those changes were to widen the front panels, widen the center back panel for more gathering, and shorten the side back pieces at the ends.
Basically each panel (2 front, 2 side back, 1 center back) are just big squares. I did end up using those Version 3 panels to make new mock-ups of the center and side back panels – just used some scrap lining I had in my stash. For the front panels I just used the Version 3 pieces as a pattern to cut my silk chiffon. Unfortunately I was slightly too short on my silk chiffon! I had to order 2 more yards – I’d originally ordered 8.

So for the two front panels, I gathered the upper edge – I did this on the form with a running stitch by hand so I could make sure it looked right and could easily pop it out if it wasn’t. I did the same for the sleeve gatherings, and the gathering at the center back. Once I had the gathering sections looking right, I machine sewed them to make sure they wouldn’t come undone. Then sewed each seam together. The seams where the center back meet the side backs were the most difficult! They just did not want to cooperate.
Next up was the trim. I’d priced out buying bags of poly satin blanket binding, but it was going to be just as expensive to buy enough packs online as to just buy silk and make it myself. And if I’d gone poly it would not have taken to the dye as well as the silk chiffon, so I bought silk charmeuse and just cut it into strips to make the trim. They’re 6in strips, pressed into trim. I machine-sewed one side in place and then finished the other side by hand.
I kinda calculated in my mind how much yardage I’d need, and unfortunately my math skills aren’t great. LOL. I’d bought 2 yards and had to buy another yard to finish it out. Which kinda sucked because it meant I had more joins than I really wanted, but it pressed so nicely the joins aren’t really obvious. But if you go this route just go ahead and get extra.

Dyeing/Finishing:
Ok guys I have to admit I was terrified of dyeing this. I have dip-dyed all 4 previous versions, and I had planned to the same with this one. But I laid awake a good part of the night prior to dyeing worrying about it. Reconsidering my process.
The night before I marked off my dye guidelines with a ton of pins – lots extra because I knew they’d fall out as I was working. I got up early the next morning and got our back patio set up. I had 2 large tarps spread out on our concrete patio, and I had my garment rack and our photoshoot backdrop out there just for hanging things off if needed. I got 3 big plastic storage tubs out, cleaned them out, and filled them with hose water. Then I mixed in my dye. RIT Golden Yellow in one, RIT Petal Pink in the biggest tub (because the pink is the hardest to dip so I wanted to have a wide opening to work with), and RIT Hyacinth in the last one (The Hyacinth colour I couldn’t find locally, ordered on amazon.). I did a test dye on some silk chiffon and charmeuse scraps, and then proceeded…
My husband came out to help me hold up parts of the dress I didn’t want in the dye. I started with the “easy” part – the underdress. Dipped the top in the yellow. Curved the center section into the pink (with my husband holding up the top part and train section so I could concentrate on getting everything I wanted into the dye), and then finally the end down into the lavender. It… didn’t turn out great. I’ve always had good luck dyeing spandex – it actually takes regular RIT dye decently well. But this spandex just sucked it up like crazy and ended up a lot more saturated that I expected. And my pink section was larger than I wanted and came down lower in the front than I planned.

I hung it up to dry and decided I’d just deal with it later. But after that I knew I need to switch it up – there’s no way I could dip-dye that silk chiffon and be happy with it. So, I went and found a spray bottle, washed it out, and loaded it up with yellow dye straight out of the plastic bin. I got my outer dress outside, tucked the back end up in a garbage back to protect it, and laid the 2 front panels out as flat as possible on my tarps. The tarps were pretty wet at this point, so the fabric was fully sitting in water for the most part. I started spraying my dye in the yellow areas – and it took several sprays to build up the colour. I had to watch and make sure no dye got into the standing water and meandered down into other sections, but overall I think the fabric being IN water and the slowness of the dye build-up helped create a gentle colour transition.
Once the yellow was done, I switched to pink and repeated the process, then the lavender. Once the front panels were done, I hosed them down with a gentle mist, and then laid them up over some of our kitchen stools to stay out of the way while I did the back. I started doing the back the same way, but part of the way through (after I’d finished most of the yellow and pink and was starting on the lavender) I decided to switch to my dressform. I brought my form downstairs, wrapped her in a garbage bag to keep her dry, and pinned the outer dress to it. Then I just sprayed the remainder on – I hadn’t started with the dressform because I was worried about dripping/gravity causing some of the colours to bleed further down than I wanted, but that didn’t really happen. I even went back and touched up the yellow and pink areas with it on the form and didn’t see any drippage.

Towards the end, I ended up dipping the bottom edges of both the front and back directly into the lavender dye bin – I just wanted to make sure the colour was solid and the lavender was the one I was having the hardest time getting well saturated. And as I said above, I went back and touched up yellow & pink areas with the spray bottle, and once everything seemed pretty done, I left it in the sun to dry for about a half hour.
After it had dried a bit, I went and double checked everything and did a few more touch-ups. Then gently misted it down again and let it dry once more. Overall, dyeing it this way took about 3 hours. Once it was like 80% dry I brought it inside and took it upstairs to start ironing it. I was concerned the silk charmeuse trim had shrunk; but once I started pressing it, it straightened right out – it had just gotten wadded up funny in the water especially along the back edge.
Thankfully the inner dress faded a bit as it dried, though it’s still not exactly what I wanted… I went back and added some more lavender to the bottom where the pink had come down too far. Once it was dry, I put both sections on my dressform and basted the outer dress in place on the inner dress, then machine sewed them in place. I sewed the upper arms “closed” (just a couple of stitches to keep them curved around my upper arm) and I also added an elastic waist-stay at the center back – it closes in the front with a swimsuit hook, just helps keep the back from slipping down. I also sewed in my inner sleeves – just 2 tubes of spandex that hold the sleeves in place – I just hand-stitched them in spots into the outer dress sleeves.

Wig:
In previous versions I’ve always used a hairpiece for the back curved section and used my own hair for the front. But getting my own hair styled with enough volume was always a pain, so this time I decided to go full wig.
I got a lacefront “Renee” from arda and a pack of matching extensions. First up, I made an extension for the curved shape. This little extension went through a LOT of edits. It was made of leftover black Misato stretch fabric and stuffed with batting. I added onto it, I cut off part of it and made a new curve, added more onto it… it took a lot of trial and error to get it shaped right and placed on the wig right!
Once it was done, I covered it in my extension hair so it would match, and then I sewed it into the wig cap with a curved needle (making sure to catch the wefts of the back of the wig and not just hair). Then I started pulling the actual wig hair over it, sewing it into place with the curved needle and brown thread. Then spraying the hell out of it with Got2B hairspray and high heat with my hair dryer. I left the two front most pieces of hair free, so they can be pinned back when I actually put it on.
The headbands were 3D sculpted by my husband! First thing he’s ever 3d modeled. He printed them and I painted them, a flat lavender first and then a wash of a darker, more <greyed out purple to bring out the details. The details did get a little lost – so my husband is working on version 2 of the headbands with better detailing for future prints. He’s hoping to have these available soon. Once they were painted, I super glued the grey pearls all over them, and then glued brown felt onto the inside. Then I sewed all but the biggest one directly onto the wig.

The biggest headband I sewed a comb into the center bottom, and I put it on after I have the wig on my head. If I’d sewn it in place, I’d have had a really hard time putting the wig on! So I add it at the end and curl the front hair around it.
Jewelry/Accessories:
My necklace is off the same mold as my Version 2/3/4 necklace. Which thankfully we still had! I got some mother of pearl adhesive veneer on amazon, and my husband applied it to the necklace and painted the trim in gold. I added the necklace closure.
My armbands were 3d printed from a file we found online and edited slightly. My husband painted them and again added the pearl veneer.
The brooches at the front and center back and made with a felt backing, pearlized sequins and pearls, with added strands of beads. This is one piece I’d like to upgrade one day but they’ll do for now.
The shoes I bought on amazon.
History: Am I… finally done with this? After 5 versions is my quest finally over? I think it is. I’m satisfied with this version. Maybe a few updates… like I want to sew the inner sleeves of the dress in a bit better because right now they’re twisting, and maybe update those brooches on down the road.
![]()


![]()


Please note that none of these costumes are for sale! This is my personal portfolio.